When I first saw this plugin I didn’t know what to expect. What is this for? Several questions came to my mind:
- I already have a multisite Word Press installation (1 Network). Could I have 2 or more Networks each one with multisite feature enabled? YES
- But I need a central user repository. Can this be done? YES
- I don’t want to login each time I change from one network to another. Can this be done? YES
- I want to have a single WordPress installation no matter the network. Is this possible? Partially. You can share your wp-content folder among Networks, but wp-admin, wp-includes and wpconfig.php have to stay separately for each Network.
- Ok, but I want to be able to control which plugins active for each network. Can I do it? YES
- What about themes? Can they be separately activated within each Network? YES
- Wait a minute! If wp-content is shared, what about uploads directory for each site? Can I put them in a central folder no matter the Network they belong to? YES
This doesn’t sound bad, does it? The official description if this plugin is:
WP Multi Network allows cape wearing super admins to create new network collections of sites, allowing for infinitely extensible site, network, and domain arrangements.
Possible scenarios you want to have this kind of installation:
1. You want to have a portal site divided for type of audience.
Lets say that you have a space dedicated to Movies: http://www.mysite.com/movies/
Another space dedicated to video games: http://www.mysite.com/games/
And a different one just for TV shows: http://www.mysite.com/tv/
You need each space to be theme and plugin independent. Also you want to be able to create as many subsites as you want in each space. And of course, you want to grant access to certain users to each space from a central users repository.
2. A simplest example.
You want to have a child subsite. I mean. You have your network site: http://www.mysite.com/. From here you can create subsites with the multisite feature like http://www.mysite.com/subsite/. But let´s say you need a subsite within a subsite and has to be independent from the parent http://www.mysite.com/subsite/subsite/. You need to create a network for the subsite.
Hands on
I haven’t found much information about how to use this plugin properly. So, I decided to write this post of my own experience.
I already have several networks working with around 400 Word Press sites on them so I think I did fine.
1. First of all, you have to install Word Press with multisite feature. Check this post if don’t know how to do this:
Remember this first installation will be your root site. The parent network from where the others networks are going to grab themes, plugins and users file uploads.
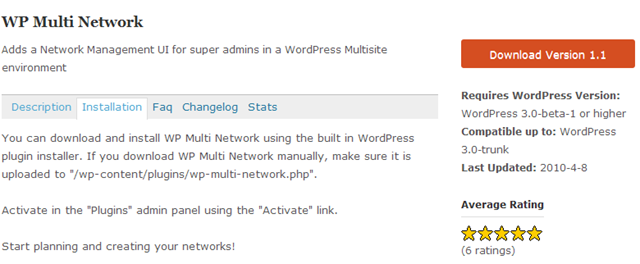
2. Download the WP Multi Network plugin. Thanks John James.
http://wordpress.org/extend/plugins/wp-multi-network/
3. Upload it to /wp-content/plugins/wp-multinetwork.php/ and activate in the “plugins” panel.

You will see a new option called “Networks” from the Super Admin menu.
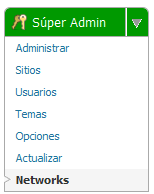
This plugin made some changes to your database so you can have more than one Word Press Network or Site. As you can see in this screen, you are viewing your sites or networks (in your case you might see only one).

All networks are stored in the same database so they can share users. It really doesn´t matter if you have them in the same Web Server or domain. What matters is that they belong to the same MySQL DB.
How to create a new network
For example, I have my root site on:
http://www.myserver.com/
I want to have a different network on:
http://www.myserver.com/blogs/
So I can create different blogs for each Profesor at the university. For example, I need to create the blog of several profesors:
http://www.myserver.com/blogs/profesor1/
http://www.myserver.com/blogs/profesor2/
http://www.myserver.com/blogs/profesor3/ ...and so on.
I need all this but I don’t want to touch my root installation. This blogs subsites have to be independent from my root site but at the same time have to be user related.
1. You have to fiscally copy some Word Press Installation files from your root or parent installation (/) to your target URL. So create a folder named /blogs/ and copy the files below:
- wp-admin folder
- wp-includes folder
- 27 files from Word Press root installation (index.php, wp-activate.php, wp-config.php, etc.)
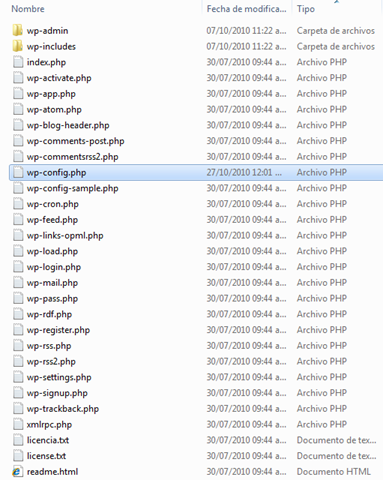
27 files and 2 folders in total.
If you are using IIS on Windows, you might want to convert the folder to a web application as well and check your URL Rewrite Module configuration.
2. Open your wp-config.php (/blogs/) file in your target network. Make sure this settings are the same as in your root or parent wp-config.php (/) file:
[php]// ** MySQL settings – You can get this info from your web host ** //
/** The name of the database for WordPress */
define(‘DB_NAME’, ‘YOURDB’);
/** MySQL database username */
define(‘DB_USER’, ‘YOURDBUSER’);
/** MySQL database password */
define(‘DB_PASSWORD’, ‘YOURDBUSERPWD’);
/** MySQL hostname */
define(‘DB_HOST’, ‘YOURDBHOST’);
[/php]
3. Add these lines below the DB_COLLATE definition:
[php]/** This is very important.
* This is the path of your global wp-content for all your networks. Themes, blogs.dir, Plugins, etc. depend on it.
* Make sure is correct. Change the YOUR_ROOT_SITE accordingly
*/
define( ‘WP_CONTENT_DIR’, $_SERVER[‘DOCUMENT_ROOT’] . ‘/YOUR_ROOT_SITE/wp-content’ );
define( ‘WP_CONTENT_URL’, ‘http://YOUR_ROOT_SITE/wp-content’);
define( ‘WP_PLUGIN_DIR’, $_SERVER[‘DOCUMENT_ROOT’] . ‘/YOUR_ROOT_SITE/wp-content/plugins’ );
define( ‘WP_PLUGIN_URL’, ‘http://YOUR_ROOT_SITE/wp-content/plugins’);
[/php]
Single Sign-On between different networks
4. Find this part in your root or parent wp-config.php (/).
[php]
/**#@+
* Authentication Unique Keys and Salts.
*
* Change these to different unique phrases!
* You can generate these using the {@link https://api.wordpress.org/secret-key/1.1/salt/ WordPress.org secret-key service}
* You can change these at any point in time to invalidate all existing cookies. This will force all users to have to log in again.
*
* @since 2.6.0
*/
[/php]
Add this just below it:
[php]define(‘COOKIE_DOMAIN’, false);
define(‘ADMIN_COOKIE_PATH’, ‘/’);
define(‘COOKIEPATH’, false);
define(‘SITECOOKIEPATH’, false);
define(‘COOKIEHASH’, md5(‘http://YOUR_ROOT_SITE’));
[/php]
Now copy the entire block from this root file wp-config.php (/) and replace it in the new wp-config.php (/blogs/) network file.
[php]/**#@+
* Authentication Unique Keys and Salts.
*
* Change these to different unique phrases!
* You can generate these using the {@link https://api.wordpress.org/secret-key/1.1/salt/ WordPress.org secret-key service}
* You can change these at any point in time to invalidate all existing cookies. This will force all users to have to log in again.
*
* @since 2.6.0
*/
define(‘COOKIE_DOMAIN’, false);
define(‘ADMIN_COOKIE_PATH’, ‘/’);
define(‘COOKIEPATH’, false);
define(‘SITECOOKIEPATH’, false);
define(‘COOKIEHASH’, md5(‘http://YOUR_ROOT_SITE’));
define(‘AUTH_KEY’, ‘SOME CRAZY CHARACTERS YOUR INSTALLATION GENERATED’);
define(‘SECURE_AUTH_KEY’, ‘SOME CRAZY CHARACTERS YOUR INSTALLATION GENERATED’);
define(‘LOGGED_IN_KEY’, ‘SOME CRAZY CHARACTERS YOUR INSTALLATION GENERATED’);
define(‘NONCE_KEY’, ‘SOME CRAZY CHARACTERS YOUR INSTALLATION GENERATED’);
define(‘AUTH_SALT’, ‘SOME CRAZY CHARACTERS YOUR INSTALLATION GENERATED’);
define(‘SECURE_AUTH_SALT’, ‘SOME CRAZY CHARACTERS YOUR INSTALLATION GENERATED’);
define(‘LOGGED_IN_SALT’, ‘SOME CRAZY CHARACTERS YOUR INSTALLATION GENERATED’);
define(‘NONCE_SALT’, ‘SOME CRAZY CHARACTERS YOUR INSTALLATION GENERATED’);
/**#@-*/
[/php]
The important part here is that the characters ‘SOME CRAZY CHARACTERS YOUR INSTALLATION GENERATED’ are the same between networks.
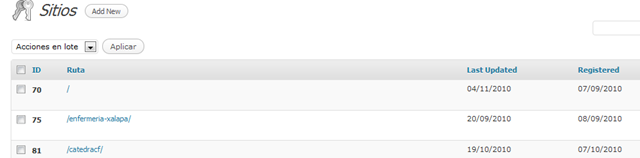
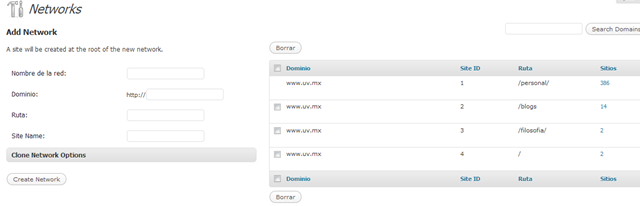
5. The last part is little tricky. You have to find out what will be your new SITE_ID and BLOG_ID. For the SITE_ID, check the latest ID site in the Networks admin panel:

In my case, the last site I created has ID 4, so the new one would have 5. In your case it might be 2.
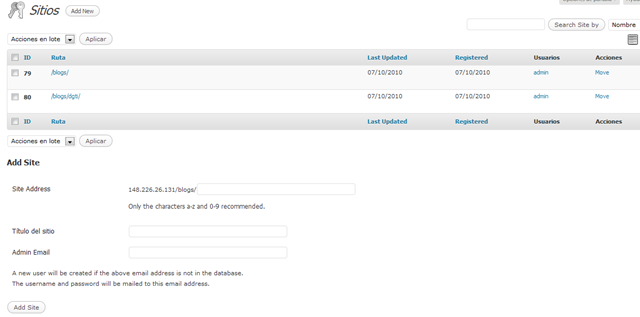
For the SITE_ID is done by checking your site list:

In my case, the last blog I made have ID 81, so the new one would have 82. In your case it might be 2
Now you have your SITE_ID and BLOG_ID numbers, find this block of code in your new network wp-config.php (/blogs/) file.
[php]
define( ‘MULTISITE’, true );
define( ‘SUBDOMAIN_INSTALL’, false );
$base = ‘/’;
define( ‘DOMAIN_CURRENT_SITE’, ‘YOURDOMAIN’ );
define( ‘PATH_CURRENT_SITE’, ‘/’ );
define( ‘SITE_ID_CURRENT_SITE’, 1 );
define( ‘BLOG_ID_CURRENT_SITE’, 1 );
[/php]
Replace the $base, SITE_CURRENT_SITE and BLOG_ID_CURRENT_SITE definitions with the new ones. For example, In my case, $base would be “/blogs/” and SITE_ID_CURRENT_SITE would be 5 and BLOG_ID_CURRENT_SITE would be 82.
This is how it would look for me:
[php]
define( ‘MULTISITE’, true );
define( ‘SUBDOMAIN_INSTALL’, false );
$base = ‘/blogs/’;
define( ‘DOMAIN_CURRENT_SITE’, ‘148.226.26.131’ );
define( ‘PATH_CURRENT_SITE’, ‘/blogs/’ );
define( ‘SITE_ID_CURRENT_SITE’, 5 );
define( ‘BLOG_ID_CURRENT_SITE’, 82 );
[/php]
6. All set. Let’s create our new Network from the Networks admin page. Just enter the information depending on your needs. For this example, this are the values:
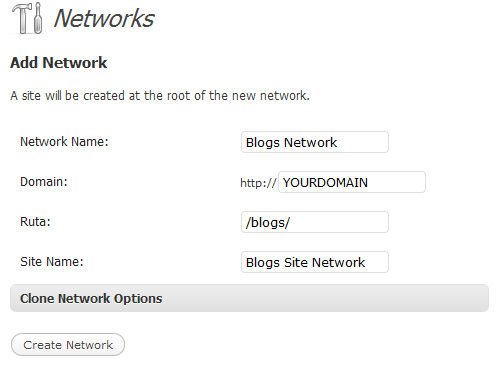
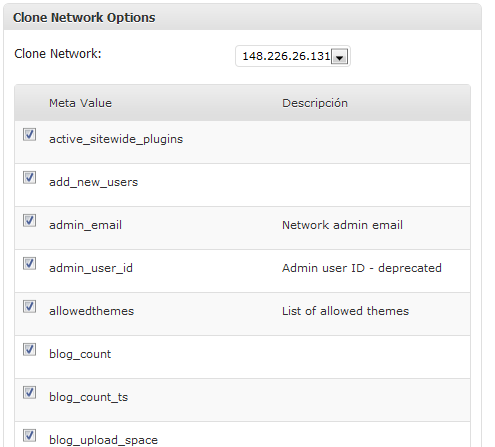
Click on the “Clone Network Options” link. I recommend you that select all options except siteurl. You can change those later on.
Click on Create Network and your are done. You have created another blog network with one new site. Click in the Site count link on the right to log into the new network.
You are redirected to the new network. You see now the site list with one element: Your new site.
(I already have 2 sites created that’s why the IDs doesn’t match the example).
Observe that you can create another subsites in the /blogs/ network. You also can assign existing users to these sites. Click on users so you can see that users are global.
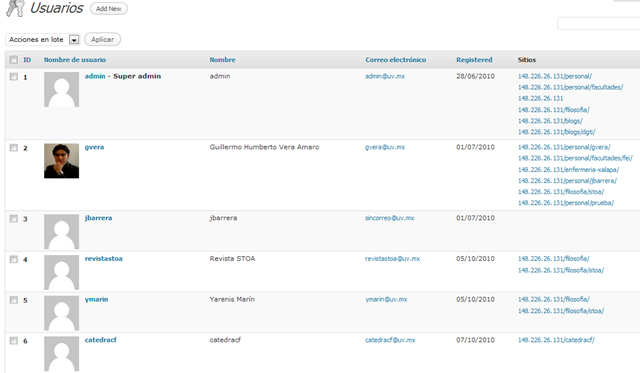
You can have several sites in different networks with access for the same user. That’s the main feature of this plugin.
You can change the settings for each network in the Super Amin->Settings Page accordingly to your needs.
Hope this works for you as much as it’s been working for me so far.